AWS has a Twitch channel and they release very informative sessions on that channel live as well as recorded for you to watch on demand.
There is one series about developing a sample application that is fully covered by the AWS free tier. The development is done using the CDK along with typescript as an implementation language. The first episode of that mini-series is available here.
The Cloud Development Toolkit (CDK) is a way to bring AWS closer to developers by allowing developers to create AWS Cloud Infrastructure in the language of their choice, meaning in the language they already know very well. The CDK then outputs files containing CloudFormation (CF) commands.
CF is described as the assembler of AWS, as such, generating CloudFormation commands using the CDK is a little easier than writing CF directly.
CF is a way to have infrastructure as code, meaning a way you can store your infrastructure in version control systems and you can rebuild the same infrastructure repeatedly from code again without running the risk of making mistakes.
This article lists a subset of the AWS WebServices that I encountered during my preparation for the cloud practitioner exam. It is a single-page overview for easier access to the myriads of services that AWS provides. To support searching using the browser search feature (Ctrl + f), the service names are written out with spaces in between and also as a single word so that your search matches either way. (e.g. searching either by Light Sail or LightSail will find the service). You can also search by acronym (EBS, EC2, RDS, …)
Because Amazon AWS makes this distinction visible to the customer, it is helpfull to have an idea what the idea behind those terms is. This article explains the differences very well.
I think from a end-users perspective, the differences might not be that important than from a architectural point when designing systems. But I might be wrong.
Punch Line: On-premises access to virtually unlimited cloud storage.
Purpose: Store on-premises backups in the cloud. Host file-shares and general data in the cloud and provide them to on-premises applications with low latency.
Characteristics: Global or local? Paid or free? Public or private? Managed?
Details:
Four different types of gateways exist:
Amazon S3 File Gateway – Store and access objects in S3 from NFS or SMB file data with local caching – connect to the AWS S3 object store
Amazon FSx File Gateway – Fast, low-latency access on premises to fully managed file shares – connect Windows Servers to AWS FSx
Tape Gateway – Backup and archive on-premises data to virtual tapes in AWS – Stores virtual tapes in AWS S3 Glacier or Glacier Deep Archive storage
Volume Gateway – Hybrid cloud block storage with local caching – In cache mode, data is stored in S3 but also cached in an on-premises cache for fast access to frequently used data. In stored mode, your entire data is available on-premises and asynchronously stored in S3.
AWS Simple Storage Service (S3) (SimpleStorageService)
Punch Line: Object storage built to store and retrieve any amount of data from anywhere
Purpose: S3 is an object storage service that allows to store data in a scalable, available, secure and performant way for a vast range of applications such as web-site hosting, big-data, long-term archival, backup and restore, enterprise applications and IoT. S3 gives you virtually unlimited space but the maximum size of an individual object is 5TB.
Characteristics: Global or local? Paid or free? Public or private? Managed?
Details:
Several S3 storage classes exist:
S3 Standard – for frequent access
S3 Intelligent-Tiering -automatically moves your data based on changing access patterns between two low latency access tiers optimized for frequent and infrequent access, and when subsets of objects become rarely accessed over long periods of time, you can activate two archive access tiers designed for asynchronous access that are optimized for archive access.
S3 Standard-Infrequent Access (S3 Standard-IA)
S3 One Zone-Infrequent Access (S3 One Zone-IA)
Amazon S3 Glacier (S3 Glacier)
Amazon S3 Glacier Deep Archive (S3 Glacier Deep Archive)
S3 Outposts – on-premises hardware for storing your data
Infrequent access (IA) does not mean the access is slow! The access will in fact be fast! It just means you will pay more if you do not stick to the limitation of infrequent access!
Amazon Elastic Block Store (EBS) (ElasticBlockStore)
Punch Line: Easy to use, high performance block storage at any scale.
Purpose: EBS is considered a hard-drive in the cloud or virtual hard disk in the cloud! You can back up your EBS volumes using snapshots which are point-in-time copies of the data. EBS is a block-storage service designed for use with Amazon Elastic Compute Cloud (EC2) for both throughput and transaction intensive workloads at any scale.
Characteristics: Global or local? – Replicated within an AZ Paid or free? – Paid Public or private? – Private Managed?
Details:
EBS is mostly explained and used in conjunction with EC2 instances. An EC2 instance has internal storage which is removed when the EC2 instance is stopped (I think there is a way to not loose that internal storage). The additional benefit that EBS provides in this scenario is to act as storage for EC2 instances, that is not lost after stopping EC2 instances.
Snapshots can be used to quickly restore new volumes across a region’s Availability Zones, enabling rapid scale.
Billing: EBS volumes are billed per second with a minimum of one minute.
Amazon Elastic File System (EFS) (ElasticFileSystem)
Punch Line: Simple, serverless, set-and-forget, elastic file system
Purpose: lets you share file data without provisioning or managing storage. This is a file-system as a service which can be mounted into operating systems.
Characteristics: Global or local? – Replicated within an AZ (depends on storage class!) Paid or free? – Paid Public or private? – Private Managed? – Yes
Punch Line: Secure and resizable compute capacity to support virtually any workload
Purpose: A EC2 instance is a server created and destroyed on demand. EC2 is a IaaS model.
Characteristics: Global or local? – A EC2 instance is run within a AZ. Paid or free? – Paid Public or private? – Private Managed? – No
Details:
A EC2 instance is a server build from an Amazon Machine Image (AMI) which determines which operating system is run on the server. EC2 instances can be created and destroyed on demand. Different levels of CPU power, RAM, NetworkInterfaces and storage can be chosen from which ultimately determines the price to pay for running the instance. You can install whatever applications you want onto a EC2 instance (within the limits of the end user agreement). An EC2 instance is a IaaS type of cloud computing.
You can create an EC2 instance from an AMI, install software on it and configure it any way you like. Then you can create a snapshot and store that snapshot into an EBS Volume. A snapshot is a state of the EC2 instance and can be used to restore that state. Then an AMI image can be created from the snapshot stored in the EBS volume. If that new AMI image is used to create an EC2 instance, you will get a fresh instance that has the same software and configuration as the machine the initial snapshot was created from. (This reminds me of docker image files and docker containers in a way).
Billing:
There are several payment options for EC2 instances.
On Demand – most flexible and most expensive. Useful, when you cannot predict the workload at all.
Reserved Instances (RI) – Exactly 1 year or exactly 3 year commitment to an EC2 instance. Up to 72% discount. Useful, when you know the workload in advance. Reserved Instances come in three flavours, Standard, Convertible and Scheduled. With Standard you can change the Availability Zone, the instance size and the network type if your are running Linux. With Convertible, you can change the same things as with standard but on top of that you can also change the family, the OS the payment option and the tenancy (= shared or reserved). The families contain different sizes. Families are (General Purpose, Compute Optimized, Memory Optimized, Accelerated Computing, Storage Optimized) see EC2 instance types. You can use Scheduled RI to get access to a EC2 instance based on a time-window you define. For example if a system is predominantly used for closing up shop, you want to spin up more instances around 5pm. Hint forReserved Scheduled Instances! You cannot use Reserved Scheduled Instances right now. Amazon does not offer them right now and does not plan on offering them in the future!
Spot-Instance – AWS will give their unused resources to the highest bidder to prevent resources from being idle. As soon as AWS can sell the resource as any other, higher valued payment option and the resource pays better than Spot-Instances, AWS will notify you (2 minutes ahead of terminating the instance) and then terminate your workload, take away your EC2 instance and give it to someone else. AWS can reclaim spot instances at any time. The saving is up to 90%. Use cases are batch jobs that can be paused or done again. Imagine a job that takes a look at all the images in your application and has the purpose of scaling the source images down to smaller file sizes using the ImageMagic tool. This is often used for HTML 5 image source sets. A source set contains the same image in several sizes. The browser responsively computes the layout and retrieves the image from the set that fits best into the space allocated. The server has to only serve the best fit and therefore saves bandwidth. This batch job can be stopped at any time and run again the next night because it can just pick up, where the last run was aborted. It will just continue converting images for image sizes, where there is no scaled down image available yet.
Dedicated Instances – Dedicated EC2 instances will be run on hardware dedicated to your organization. There is no more multi tenancy!
Dedicated Host – Instead of getting a multi-tenant host that is virtualized, you will get a single-tenant host that you can use. Useful for workloads that require access to individual CPU such is the case for software that is licenced per CPU core.
Savings Plans – Exactly 1 year or exactly 3 year commitment to EC2, Fargate and Lambda paid by the hour.
Billing: For On-Demand, Reserved- and Spot-Instances running Amazon-Linux and Ubuntu, you are billed per second but at least for one minute. Windows and other Linux distributions are billed per hour. EBS volumes are billed per second with a minimum of one minute.
Elastic IP Addresses: Elastic IP addresses are fixed IP addresses that you only are billed for when you are not actively using them. You can attach them to EC2 instances and also reattach them to other instances BUT ONLY WITHIN ONE REGION! Elastic IP addresses are for use in a specific region only and can therefore only be remapped between instances within that region. You can use Elastic IP addresses to mask the failure of an instance in one Availability Zone by rapidly remapping the address to an instance in another Availability Zone.
Purpose: You can simply upload your code and Elastic Beanstalk automatically handles the deployment, from capacity provisioning, load balancing, auto-scaling to application health monitoring. At the same time, you retain full control over the AWS resources powering your application and can access the underlying resources at any time.
Punch Line: Amazon QuickSight is a scalable, serverless, embeddable, machine learning-powered business intelligence (BI) service built for the cloud.
Purpose: Lets you build dashboards that display data relevant for BI which was mined using machine learning techniques which are predefined and provided for lowering the barrier of adopting this technology. Amazon QuickSight makes it easy for BI teams to perform advanced analytics (for example: what-if analyses, anomaly detection, ML-based forecasting, churn prediction etc.) without prior data science experience. Also for teams with ML-knowledge, should your team have models stored in Amazon SageMaker, they can integrate those models into QuickSight. QuickSight can be asked questions in plain english! e.g., what is the year-over-year sales trend?
Characteristics: Global or local? – ? Paid or free? – Paid Public or private? – Public Managed? – serverless
Punch Line: No cost, self-service portal for on-demand access to AWS’ compliance reports.
Purpose: If you are forced to proof that your system, built with AWS, complies to certain rules and regulations, AWS Artifact is the centralized location from where you can retrieved certificates and reports that AWS has collected about all their services. Instead of going through the process of getting your application approved by local government organizations yourself, utilize AWS’ investments and check if the document you need is already available for download from AWS Artifact. You can access AWS Artifact from within your dashboard.
Punch Line: Managed Microsoft Active Directory in AWS
Purpose:Microsoft Active Directory is a product initially developed by Microsoft as a central repository of users. AWS Directory Service is a cloud based implementation of Microsoft Active Directory. AWS Directory Service adds support on a feature called Federation which then ultimately leads to support for Single Sign On (SSO) for which Amazon Single Sign On (SSO) exists. Instead of users being authentifacted by the app the user wants to use next, Users can be identified by any source as long as that source takes part in Federation. As long as you can prove that you are the user you claim to be, you get logged in. You can prove your identity via a login to an account in Google, Facebook, Amazon, AWS IAM, Active Directory or any other trusted Federation source. Once you logged in to any of these sources, the sources will share (federate) your identity. This also adds Single-Sign-On capabilities. A single login is enough to grant you access to all federated software because you have already proven your identity at another application and the federated applications trust each other.
Punch Line: Centrally manage access to multiple AWS accounts or applications.
Purpose: Have a single place to manage all user identities. User identities can be store in various sources such as Microsoft Active Directory, Azure Active Directory or Okta Universal Directory. You can also directly create user identities in AWS SSO.
Create a user pool in Cognito. Several applications can now share that same user pool.
Create an app client. An app client is a app that uses a user pool.
Create the domain name. The Domain Name is the URL that users use to sign it. The domain name url has to be globally unique.
Edit App Client Settings. Set sign-in and sign-out URL and set the allowed OAuth2 flows. Set the scopes.
To allow users to login via their google account, create a project in google’s GCP. Modify the OAuth consent screen as external. Set the authorized domain to amazoncognito.com.
Link Google to AWS OAuth2 via a client. In GCP create a OAuth2 Client ID. As URI enter your the Cognito hosted UI/Domain Name (it is the one that had to be globally unique). Then postfix the Domain Name with /oauth2/idpresponse. You will get a client ID and a client secret.
In Cognito go to Federation and then to Identity Providers. Select the Google option.
Add an attribute mapping to map Google profile to your userpools attributes.
Go back to the app client settings. A google option is now added.
AWS Systems Manager Parameter Store (SystemsManagerParameterStore)
Punch Line: Parameter Store, a capability of AWS Systems Manager, provides secure, hierarchical storage for configuration data management and secrets management.
Purpose: From the AWS website: “Parameter Store, a capability of AWS Systems Manager, provides secure, hierarchical storage for configuration data management and secrets management. You can store data such as passwords, database strings, Amazon Machine Image (AMI) IDs, and license codes as parameter values. You can store values as plain text or encrypted data. You can reference Systems Manager parameters in your scripts, commands, SSM documents, and configuration and automation workflows by using the unique name that you specified when you created the parameter.”
Punch Line: Easily rotate, manage, and retrieve database credentials, API keys, and other secrets through their lifecycle
Purpose: In contrast to the AWS Key Management Service (KMS) which is for keys, the Secrets Manager enables you to easily rotate, manage, and retrieve database credentials, API keys, and other secrets throughout their lifecycle. Users and applications retrieve secrets with a call to Secrets Manager APIs, eliminating the need to hardcode sensitive information in plain text.
Difference to other services: How is the Secrets Manager different from the Systems Manager Parameter Store? Read this article. In short, the Secrets Manager is newer and has more features such as the very convenient feature to automatically rotate secrets.
Punch Line: Easily provision, manage, and deploy public and private SSL/TLS certificates for use with AWS services and your internal connected resources
Purpose: A manager for your SSL certificates. As certificates can expire, automatic renewal is a very important point. AWS Certificate Manager removes the time-consuming manual process of purchasing, uploading, and renewing SSL/TLS certificates.
To drive home the importance of automatic renewal of SSL certificates, imagine this scenario of a production environment: A shop system has to retrieve the products from a central product catalog, it has to validate and charge the customers credit card on purchase, it has to send emails to customers, it has to notify backend systems to trigger the packaging and shipping of products after a successfull purpose. In short the shop has to connect to a lot of systems and all connections have to succeed in order to not cause the order process to fail and the company to potentially have unsatisfied customers or even loose money because customers cancel their orders. The connections are all secured by TLS certificates. Should a certificate expire, the connections will fail during production! This basicly mounts to a production stop, which turns into a customer-facing error of the customer’s order which is not what you want ever! Thankfully all systems are accessible for the admins or devops engineers. The issue can be identified and remedied by exchanging new certificates. But the issue could have been prevented by using automatic certificate renewal in the first place.
Now imagine this second scenario which is much more severe and outright catastrophic but also rooted in non-automated certificate renewal. Say a company manufactures a small embedded device that is installed at the customer, hence at a remote location and the embedded device is connected to the companies servers used to manage the devices over the public internet! Naturally the traffic between the device and the management servers has to be encrypted which is why certificates are used in this scenario. The management servers provide updates to the firmware and application software running on the embedded device. Software engineers work on new releases and publish those new releases on the management servers. The embedded device will ping the management servers once a day to check for new updates which the user can then choose to ignore or install. Also the management systems keep inventory of all devices and the list of licences the customer has purchased to keep the customers from illegally unlocking functionality by forging licences. Now imagine, the certificates expire.
That is all she wrote for the embedded devices installed at the customer! Those poor devices will not be able to connect to the management servers, because the certificate that they are told to trust has expired! They will try to talk to the management servers and they will consider those as compromised, insecure communication partners, as the certificates have expired! How do you inform the devices about new certificates to trust? You can’t because non of your remote connection attempts will ever be accepted by the remote devices! The only solution is to send out technicians to all customers to update the trusted certificates on the devices. This is too costly! Also image the damage such as incident causes to the companies reputation. The company wants to provide new, innocative products to the customer, but they cannot even connect to their devices because they forgot to renew certificates? There is no credible explanation for this incident other than the company being incompetent beyond believe.
The correct way to treat this scenario is to renew certificates shortly before the old ones expire and in the period where they are still valid. You send the new certificate over the secured connection to the embedded device which will then trust both certificates, the old and the new one until the old one expires and only the newly installed certificate is valid! What happens if this process is not automated but is a manual process? The result is that people switch jobs and a new B-Team takes over. That B-Team has no idea about the manual renewal of certificates and the worst possible scenario manifests itself as your personal new hellish reality. Have fun, talk to you later…
Purpose: AWS Trusted Advisor provides real time guidance to help you provision your resources following best practices.
AWS Trusted Advisor is an automated system that scans your infrastructure. Based on the tier you payed for, the list of checks vary. After scanning the system and applying the checks, a list of results is presented to you and you can get started working on improving your system. Checks are done so you can then improve on the overall costs and overall performance, security, fault tolerance and raise the service limits.
Whenever you read the term ‘service limits’ in an exam question, then you know that you have to select Trusted Advisor as a result.
Punch Line: Automated security assessment service to help improve the security and compliance of applications deployed on AWS
Purpose: Very similar to the Trusted Advisor but specialized on security and architectural best practices. It is an automated system that scans your infrastructure and produces a report that you can then use to come up with a list of steps to remedy the findings. It can be part of your DevOps automation and therefore automates the process of enforcing compliance to security standards.
Punch Line: Amazon Elastic Transcoder is media transcoding in the cloud. It is designed to be a highly scalable, easy to use and a cost effective way for developers and businesses to convert (or “transcode”) media files from their source format into versions that will playback on devices like smartphones, tablets and PCs.
Amazon Elemental Video Convert (ElementalVideoConvert)
Punch Line: Simple, scalable, and serverless data integration
Purpose: Very large companies create what is called an application landscape over the course of decades. They create or purchase specialized software for specialized tasks they have.
Lets take an ISP (Internet Service Provider) as an example. A large ISP has to keep track of their inventory of switching and antenna hardware for their internet backbone and mobile infrastructure. Also they have to keep track of the configuration on each of those complex devices. An ISP has automated systems that transfer configuration over the wire to configure field devices online. They have to send out technicians to install and then maintain the devices in the field. An ISP has to bill customers and construct new landlines. The application landscape of that ISP is huge, very specialized, divers, legacy and therefore the applications in it are completely isolated from each other for the most part because the main purpose of the applications is not to integrate with each other but to perform a very complex and specialized task.
Now imagine the ISP wants to run an analysis about how expensive a specific workflow is, such as reconfiguring a specific parameter on switching hardware to allow customers to opt-in into one of the new products the ISP wants to sell. Several applications might be involved in that workflow. As applications are isolated, data has to be retrieved from those applications and aggregated into a central spot so that these types of analysis can be run in the first place. This is where AWS Glue can be used.
AWS Glue is used to discover data from different sources, clean up that data, normalize and finally combine it into a data stores (databases, data warehouses) that can be used to run queries on. As such, AWS Glue falls into the ETL category of software (ETL = Extract, Transform, Load).
This topic is so complex and exotic that I think it is best to read as many white papers on this topic as possible to even get a grasp of what ETL and working with AWS glue is like.
Punch Line: Automate your image and video analysis with machine learning.
Purpose: Think Facial Rekognition which is why the name Rekognition was choosen. With Amazon Rekognition, you can identify objects, people, text, scenes, and activities in images and videos, as well as detect any inappropriate content. To achieve this, Amazon Rekongition uses Deep Learning AI.
Punch Line: Discover insights and relationships in text
Purpose: natural-language processing (NLP) service that uses machine learning to uncover information in unstructured data. This service works fast and on a very large-scale over any documents. NLP allows a computer to understand unstructured text. A company could use Amazon Comprehend to scan their documents and also user search request input into a search field and classify and index these documents and search queries on a semantic level to ease access to better search results.
Amazon Comprehend could also be used to gain insights into documents for running analysis for business intelligence over a vast body of unstructured text.
Punch Line: Observability of your AWS resources and applications on AWS and on-premises
Purpose: Operational Health management for DevOps engineers. Can also be used to create billing alarms. Also CloudWatch collects monitoring and operational data in the form of logs, metrics, and events, providing you with a unified view of AWS resources, applications, and services that run on AWS and on-premises servers.
You can monitor your estimated AWS charges by using Amazon CloudWatch. When you enable the monitoring of estimated charges for your AWS account, the estimated charges are calculated and sent several times daily to CloudWatch as metric data. Billing metric data is stored in the US East (N. Virginia) Region and represents worldwide charges. This data includes the estimated charges for every service in AWS that you use, in addition to the estimated overall total of your AWS charges. The alarm triggers when your account billing exceeds the threshold you specify. It triggers only when actual billing exceeds the threshold. It doesn’t use projections based on your usage so far in the month.
Differences to other services: CloudWatch is for performance monitoring whereas CloudTrail is for auditing. CloudWatch is for monitoring how the services perform, CloudTrail is for auditing what people do.
AWS Service Health Dashboard (ServiceHealthDashboard)
Purpose: Displays a list of all AWS WebServices and their status. If your systems do not work, a very quick approach to initial debugging is to check if the AWS infrastructure is actually working currently on your continent. This is the baseline to every opertional success. The Service Health Dashboard is available publicly even without a working AWS Account! It displays the status (= health) of all AWS services split up by continent.
AWS Personal Health Dashboard (PersonalHealthDashboard)
Punch Line: View important events and changes affecting your AWS environment
Purpose: In contrast to the Service Health Dashboard which displays the health of all AWS services across Amazon AWS and which pertains to all users globals, the Personal Health Dashboard is personalized to the subset of AWS services, you are using in your deployments!
Punch Line: Gain operational insights and take action on AWS resources
Purpose: AWS Systems Manager is the operations hub for AWS. Systems Manager provides a unified user interface so you can track and resolve operational issues across your AWS applications and resources from a central place.
AWS Systems Manager gives you visibility and control of your infrastructure on AWS. Systems Manager provides a unified user interface so you can view operational data from multiple AWS services and allows you to automate operational tasks across your AWS resources.
Punch Line: Fully managed, scalable, and secure Elasticsearch service
Purpose: Amazon Elasticsearch Service is a fully managed service that makes it easy for you to deploy, secure, and run Elasticsearch cost effectively at scale.
Punch Line: Fast and flexible NoSQL database service for any scale
Purpose: Amazon DynamoDB is a key-value and document database that delivers single-digit millisecond performance at any scale. It’s a fully managed, multi-region, multi-active, durable database with built-in security, backup and restore, and in-memory caching for internet-scale applications.
Punch Line: Fast, reliable graph database built for the cloud
Purpose: Amazon Neptune is a fast, reliable, fully managed graph database service that makes it easy to build and run applications that work with highly connected datasets.
Punch Line: Start querying data instantly. Get results in seconds. Pay only for the queries you run.
Purpose: Amazon Athena is an interactive query service that makes it easy to analyze data in Amazon S3 using standard SQL. Athena is serverless, so there is no infrastructure to manage, and you pay only for the queries that you run. Athena is easy to use. Simply point to your data in Amazon S3, define the schema, and start querying using standard SQL.
Purpose: AWS Shield is an always on service that protects your applications from DDoS attacks. You do not have to contact AWS personnel.
There are two tiers (Standard and Advanced) of AWS Shield. Standard applies to all AWS customers. Shield Standard protects CloudFront and Route 53. Advanced protects CloudFront, Route 53, EC2, ELB and Global Accelerator.
Punch Line: Easily create and control the keys used to encrypt or digitally sign your data
Purpose: Uses the AWS hardware security modules (CloudHSM) to generate and manage keys that your applications can use to encrypt and decrypt data. It is integrated with CloudTrail and will show key usage in the logs of cloud trail. It helps fulfill compliance and regulations. AWS KMS allows you to rotate keys from a central locations. Applications will not fail during key rotation because they will just take the new current key from AWS KMS and continue to work. Rotation the keys minimizes the time systems are being compromised or even tries to completely prevent that from happening.
Pricing: From the AWS page at the time of this writing, please check current information: “There is no commitment and no upfront charges to use AWS KMS. You only pay US $1/month to store any key that you create. AWS managed keys that are created on your behalf by AWS services are free to store. You are charged per-request when you use or manage your keys beyond the free tier.” “20,000 requests free per month with the AWS Free Tier“
Punch Line: Analyze and visualize security data to rapidly get to the root cause of potential security issues and suspicious activities.
Purpose: AWS Detective is in some way the ETL tool for security analysis. Some security problems are so complex, that they can only be debugged and understood by analysing data from different sources. Amazon Detective can analyze trillions of events from multiple data sources such as Virtual Private Cloud (VPC) Flow Logs, AWS CloudTrail, and Amazon GuardDuty, and automatically creates a unified, interactive view of your resources, users, and the interactions between them over time. Then Machine Learning techniques can be applied to that consolidated data to quickly work out issues.
Difference to other services:How does AWS Detective differ from Amazon GuardDuty, Amazon Macie, and AWS Security Hub as well as partner security products? AWS Detective is used when the other mentioned tools above are not substantial enought to investigate an issue. When the other tools cannot identify the root cause of a security issue, it is time to use AWS Detective. AWS Detective differs from X-Ray in that AWS Detective helps you to find the root cause of security issues and suspicious activities whereas X-Ray is not about finding security issues using MachineLearning but rather about tracing event and message flows between large, distributed systems built using microservices. X-Ray is a debugging tools if you have to hunt down an error. It is not so much about security issues.
Punch Line: Protect your AWS accounts, workloads, and data with intelligent threat detection and continuous monitoring
Purpose: Guard duty constantly monitors your logs and applies machine learning, anomaly detection, and integrated threat intelligence (= what is that?). AWS GuardDuty also monitors for activity such as unusual API calls or potentially unauthorized deployments that indicate a possible account compromise. It also detects potentially compromised instances or reconnaissance by attackers. From here: “Reconnaissance’, which is often shortened to ‘recon’ is a military term for observing a region to locate the enemy or find information to design an attack strategy. Within IT, the term is normally classified as either ‘active’ or ‘passive’ with each referring to different methods.
Difference to other services: How does AWS GuardDuty differ from AWS Macie? AWS Macie does not parse logs for security issues but it does look at data stored in S3 buckets and applies machine learning and pattern matching to identify personally identifiable information (PII). If you store PII at least in Europe, you have to adhere to EU-Datenschutz-Grundverordnung (DSGVO) and General Data Protection Regulation (GDPR). That means the first step is to know where PII is stored and go from there to make sure you can fulfill the DSGVO requirements. AWS Macie helps you in this use case. How does AWS GuartDuty differ from AWS Detective? AWS Detective is about finding security issues and suspicious activities using MachineLearning. AWS GuardDuty is basically does the same thing! For me it is hard to pinpoint the differences between those two services with the knowledge I have currently. If you want a convoluted answer that does not identify any substantial differences, read the FAQ section of AWS Detective and therein the answer to the question “How does Amazon Detective differ from Amazon GuardDuty and AWS Security Hub?”
Punch Line: Protect your web applications from common web exploits
Purpose: Have a firewall that is application specificaly tailored to web applications. It understand the most common attacks and it knows the most common request patterns of malicious intent. Select rules from a catalog of rules provided by security experts. Rules are called Web ACLs.
Difference to other services: How is WAF different to Security Groups and NACL. Security Groups are Instance-Level firewalls for EC2, NACL are Firewalls at the subnet level. Both care not about the specifics of Web Application Security. WAF is a fine tuned service for common web exploits that happen to web applications such as cross-site scripting, code injection, SQL injection and bots. WAF can also filter out specific traffic patterns via rules.
Punch Line: Create, maintain, and secure APIs at any scale
Purpose: API Gateway handles all the tasks involved in accepting and processing up to hundreds of thousands of concurrent API calls, including traffic management, CORS support, authorization and access control, throttling, monitoring, and API version management.
For me personally, the authorization part of an API Gateway is important as this was the major part that I got in contact with when working with the API Gateway product Apigee API Gateway. The authorization was done via OAuth2. You could not access any API without first authorizing yourself against the API Gateway and receiving your OAuth2 token. I understand that AWS Cognito also hands out OAuth2 token, so I do not fully understand when to choose an AWS API Gateway over AWS Cognito.
A API Gateway can be combined with AWS Lambda to trigger Lambdas based on calls to an API endpoint!
Punch Line: Run code without thinking about servers or clusters. Only pay for what you use.
Purpose: Lambda is serverless computing. You upload small snippets of code or containers and let Lambda take care of the infrastructure behind the scenes. You define the triggers that lead to the execution of your code. An example is a lambda function that converts an image after it was uploaded by a user (the trigger) and places the converted image into a S3 bucket. Lambda is billed per call and per duration on a millisecond basis!
Punch Line: Improve global application availability and performance using the AWS global network
Purpose: AWS Global Accelerator reduces the ping or response time of your application. It is somehow able to measure internet network congestion and is able to find a route that still keeps latency low even in congested network situations.
Punch Line: Create, organize, and govern your curated catalog of AWS products
Purpose: Put applications (defined by CloudFormation templates) into the service catalog and enable the service catalog for a organization. This will limit the organization to only the allowed services listed in the catalog. You achieve this by combining a subset of services inside the service catalog into so-called portfolios which are then assign to user accounts.
This helps you adhere to compliance statements. The services within the service catalog are defined by cloud formation templates. This means the service catalog is not a list of Amazon AWS services but it is a list of engineered applications that are build on top of the Amazon AWS services. (To limit which AWS services are unlocked, use policies in the AWS Organization – Service. You can define a policy that merely allows the creation of t2 micro EC2 instances for example.)
Punch Line: Record and evaluate configurations of your AWS resources
Purpose: Config continuously monitors and records your AWS resource configurations and allows you to automate the evaluation of recorded configurations against desired configurations.
How this works is: whenever the configuration is changed on a EC2 instance, RDS database or any deployed service, the object will send a message to AWS Config about the configuration change. AWS Config, being an inventory/repository of configurations, can then compare the current, effective configuration against the expected configuration and log the differences and trigger actions. Actions are to send SNS messages or trigger CloudWatch alerts.
Punch Line: Automated, gold-standard deployments in the AWS Cloud
Purpose: Select predefined solutions from a catalog of Quick Start guides. Each Quick Start includes AWS CloudFormation templates that automate the deployment and a guide that describes the architecture and provides deployment instructions.
AWS Relational Database Service (RelationalDatabaseService) (RDS)
Punch Line: Amazon Relational Database Service (Amazon RDS) is a web service that makes it easier to set up, operate, and scale a relational database in the cloud. It provides cost-efficient, resizable capacity for an industry-standard relational database and manages common database administration tasks.
RDS supports six databases:
Oracle, Microsoft Sequel Server, MariaDB, MySQL, PostgreSQL and Amazon Aurora.
Automatically recover from failure – define business driven KPI on workloads and scale up automatically when thresholds are reached.
Test recovery procedures – simulate failure to check if your automated recovery procedure do actually work
Scale horizontally to increase aggregate workload availability – split large resource into several smaller resource and add load balancing to get a fail-safe system
Stop guessing capacity – monitor usage and automatically scale
Manage change in automation – instead of manually changing your infrastructure, have automated changes
Democratize advanced technologies: Make advanced technology implementation easier for your team – NoSQL, Media Transcoding, AI and other complex topics should be outsource to the service provider instead of training in-house employees.
Go global in minutes – Deploy close to the customer to provide a better experience
User serverless architectures – no need to maintain servers, removes cost and labour
Experiment more often – with the agility of the cloud, testing of new approaches is easier and experiments should be conducted more often
Consider mechanical sympathy – Based on your business requirements, choose the technology that suites your needs best. As AWS provides many services, choose the best fit.
Implement cloud financial management – middle and upper management has to learn just as DevOps has to learn the new technology.
Adopt a consumption model – Pay only for the computing resources you consume, and increase or decrease usage depending on business requirements
Measure overall efficiency – measure and asses cost vs. benefit gained
Stop spending money on undifferentiated heavy lifting – spend money on features that differentiate and your customers can benefit from instead of undifferentiated features (such as running data centers)
Analyze and attribute expenditure – identify the source of cost and make decisions
Purpose: With CloudTrail, you can log, continuously monitor, and retain account activity related to actions across your AWS infrastructure. A web service that records AWS API calls for your account and delivers log files to you. The recorded information includes the identity of the API caller, the time of the API call, the source IP address of the API caller, the request parameters, and the response elements returned by the AWS service.
Differences to other services:CloudWatch is used to collect metrics and set alarms based on thresholds for those metrics. CloudWatch allows you to set automated actions based on alarms and it allows you to debug your environment. Imagine there is a set of microservices and a correlation id that is used to track a workflow across all involved microservices. CloudWatch is the place where all data is aggregated into a unified view to debug those distributed workflows. CloudWatch can also be used to send billing alarms!
CloudTrail is more about security and detecting who made which configuration changes that might have affect on security. CloudWatch is about how do the services perform and which issues exist with overall system operation.
Amazon Elastic Search Service (ElasticSearch)(ElasticSearchService)
Punch Line: Fully managed, scalable, and secure Elasticsearch service
Purpose: Allows you to search through very large amounts of data (PetaByte) It is fully managed (hardware is provisioned for you, software is installed and patched for you, failure recovery, backups and monitoring is performed for you), highly available and scalable. You spend your time only on creating benefit for your business instead of managing the software or hardware. It provides APIs for popular programming languages. It integrates with ELK stash, Kibana, Logstash and also with other AWS services.
ElasticSearch is used for
Application Monitoring -Store, analyze, and correlate application and infrastructure log data. Enable trace data.
Security information and event management (SIEM) – Centralize and analyze logs from disparate applications and systems across your network for real-time threat detection and incident management.
Search – Provide a fast, personalized search experience for your applications, websites, and data lake catalogs, allowing your users to quickly find relevant data.
Infrastructure monitoring – Collect logs and metrics from your servers, routers, switches, and virtualized machines to get a comprehensive visibility into your infrastructure, reducing mean time to detect (MTTD) and resolve (MTTR) issues and lowering system downtime
Differences to other Services: CloudWatch is about DevOps and monitoring your applications on how they perform. CloudWatch can also send billing alarms. CloudTrail is about who did perform which API calls and configuration changes. It is more about tracability of security related changes. ElasticSearch also enables montoring of applications but is is more of a search engine that indexes log-data to enable free text search on those logs. As such it is not specifically a monitoring tool such as CloudWatch.
AWS Simple Workflow Service (SWF) (SimpleWorkflowService)
Punch Line: Amazon SWF helps developers build, run, and scale background jobs that have parallel or sequential steps. You can think of Amazon SWF as a fully-managed state tracker and task coordinator in the Cloud.
Differences to other services: AWS Lambda allows you to construct workflows called step functions. AWS Lambda step functions are more modern than SWF. SWF’s advantage over AWS Lambda step functions is when the process or workflow involves steps that have to be executed by humans such as scanning a barcode. E.g. it is used for “human enabled” workflows. Both step functions and SWF are used to orchestrate several systems in a workflow. If no human is involved, step functions can be used. An example is an order workflow for digital products for example.
Punch Line: Easily collect, process, and analyze video and data streams in real time
Purpose: Kinesis is about analyzing streamed information (not only video but also general data streams).
video
audio
application logs
website clickstreams
IoT telemetry data
The idea behind processing data streams is that the processing can start with the data that has already arrived without waiting for the data that is in transit or will be generated in the future. It allows to apply gready strategies to the data.
AWS Kinesis is real-time, fully-managed and scalable.
Punch Line: Automate Operations with Chef and Puppet
Purpose: AWS OpsWorks is a configuration management service that provides managed instances of Chef and Puppet. Chef and Puppet are automation platforms that allow you to use code to automate the configurations of your servers. OpsWorks lets you use Chef and Puppet to automate how servers are configured, deployed, and managed across your Amazon EC2 instances or on-premises compute environments. OpsWorks has three offerings, AWS Opsworks for Chef Automate, AWS OpsWorks for Puppet Enterprise, and AWS OpsWorks Stacks.
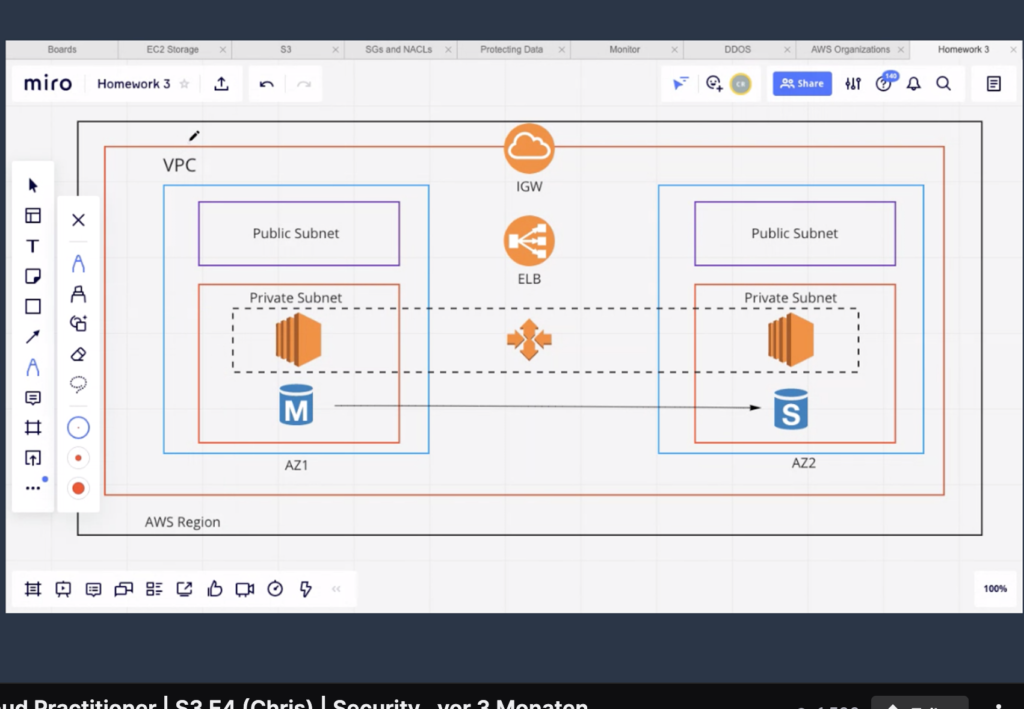
Punch Line: Build on a logically isolated virtual network in the AWS cloud.
Purpose: Within a region, build a resilient deployment of your infrastructure in your own virtual private cloud. A Internet Gateway takes traffic and forwards it to a load balancer that sends the traffic to EC2 instances inside subnets. There are private and public subnets. Subnets do not span over availability zones, they are only contained within availability zones. You can have subnets in each availability zone in the region.
The auto-scaling group that spans both the private subnets in the picture above is used to scale horizontally. The public subnets contain no resources. This is a special case but it is still perfectly possible. The traffic reaches the private instances via the Internet Gateway (IGW) and the Elastic Load Balancer (ELB)
The M-RDS Database is the master, the S-RDS Database in the other AZ is the standby database. The standby database can take over in case of failure of the master RDS database.
Punch Line: Securely manage access to AWS services and resources
Purpose: IAM is where you manage users and their rights. IAM also is the service that performs logins via the AWS Management Console (Web-Site of AWS), the CLI, the APIs and the SDKs. When you login into your user account in the AWS Management Console you first go through IAM which performs the authentication during the login. After going through IAM only then you can access the rest of the service.
The terminology used with IAM is:
Principal – a user (account), a role, a federated user or an application that can make a request for an action or operation on an AWS resource. Actions and operations are both implemented by calls to the API.
Resource – an EC2 instance is an example for a resource. A resource is what users work with when the leverage the AWS infrastructure. Resource access is secured via permissions. A resource itself can access other resources. Then also, the resource access is secured and the resource has to have permissions to access the other resources!
User (account) – the account root user (email address that created the AWS account) can add new IAM users to the account. It is allowed to add up to 5000 users to an account. A newly created user has no permission! It cannot do anything. Every permission that is not explicitly granted is automatically denied by default. Apply the least amount of permissions to a user as a best practice.
Role – roles have rights assigned to them. Roles are assumed by users, application and resources. When a role is assumed, from then on the user, application and resource is not what performs actions and operations, but the role is! Only the permissions of the Role counts when the Role is assumed! This is meant by delegation! Roles are used so you do not store access keys inside source code of applications or place them on EC2 instances. Instead roles are assigned to EC2 instances, they then assume the role and are now allowed to perform certain actions and operations.
Group – Users can be assigned to several groups (at most 10). groups cannot be nested. A group can have Policies assigned to it and therefore defines a set of permission, basically all permissions given by all policies combined. Users are assigned to groups. That way policies do not have to be assigned to each user individually, which is too much work and also introduces the risk of errors. An example for a group would be the admin group. If one employee needs access to the infrastructure of the entire business, place them into the admin group. If they do not need the administrator rights any more, remove them from the admin group.
Policy – Policies are sets of permissions. Permissions are assigned to a user via a group that has policies or by assigning a policy to a user directly. Also policies are used to assign permissions to a role. Several policies can be assigned to a user, group or role, the permissions are then combined. When a principal makes a request for an action or operation on an AWS resource, that request goes through policies before the request hits the resource. The policy can either allow the request to pass or it can deny the request. Examples for actions and operations are: Launching an EC2 instance, getting information about a S3 bucket or creating another IAM user account. Only principals that have policies that contain the rights to perform these operations can actually execute those actions and operations. Policies are defined via JSON. There are two types of policies: Identity-based policies can be assigned to users, groups and roles. Resource-based policies can be assigned to resources such as S3 buckets, EC2 instances and DynamoDB tables.
Permission – These are the fine-grained rights. I am not sure if you can even access individual permissions. It seems that you can only edit policies as JSON and that JSON then describes the permissions. I think there is no user interface in the IAM for creating individual permissions.
How to load data from a REST API to then display it inside a component? This is achieved inside the ComponentDidMount for class components and inside a call to useEffect() without parameters in functional components.
There is one important thing to know! ComponentDidMount and the empty effect are called after the components are rendered for the first time. In other words, components are rendered with empty data initially!
Make sure to design your components so that they deal with empty data without throwing any errors!
When ComponentDidMount or the empty effect have been executed and the data is finally available, the components are rendered again and this time around do have access to the REST data. Design your components in a way that they deal with data arriving at a later point in time!
The Beckhoff PLC exposes FunctionBlocks and other objects via the ADS protocol which is spoken over TCP. This article describes how to send and receive ADS requests and responses on a very basic level with golang.
I am a golang beginner so the code will not be anywhere near production grade. The code should show the very basics of the ADS protocol and the structure of the messages.
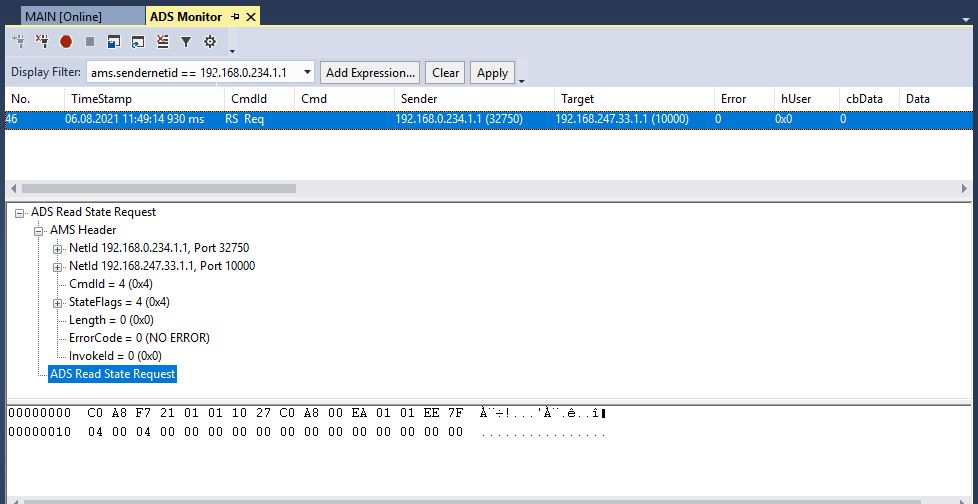
ADS Monitor
The ADS Monitor can be installed into the TwinCAT IDE and can be opened using the TwinCAT menu and the ADS Monitor menu item.
It will dissect packages. Also it contains a filter functionality. The filtering only works when the package capture is stopped! You cannot apply the filter to ongoing traffic. To apply the filter, first stop capturing. This yields a set of logged packages after stopping capturing. You then have to click on the “Apply” Button! The filter contained in the “Display Filter” edit field is then applied to the log of packets.
A sample filter is ams.sendernetid == 192.168.0.234.1.1
ADS Read State Request
One of the simplest requests to send is to ask the ADS Device (= main device in the PLC) for it’s current state. It will answer with NO_ERROR in the happy-case.
The request can be sent with a invoke id of zero (0), it requires no login or specific handshake or anything else. It is a very simple example for a Request-Response pattern.
Here is what the request looks like in the ADS monitor:
Here is what the response looks like in the ADS monitor:
The golang code to send and receive the request and response above is here:
The code has to be improved a lot. Datatype definitions have to be added for AMS- and ADS-headers. The response has to be parsed. There is no handling for the response. The code is not thread-safe, the list goes on.
The only thing this code highlights is the fact that communicating with the ADS protocol is done by sending byte buffers over a tcp port! That is a success and opens up a lot of possibilities.
Structure of the Request and the Response
The byte buffers that are sent and received are not just random byte buffers. The structure is clearly defined in the ADS protocol so that each byte buffer can be interpreted and parsed correctly.
The Automation Device Specification (ADS) data packet is wrapped inside a Automated Message Specification (AMS) data packet.
The overall packet structure (structure of the request and response bytes arrays) looks like this: There is a AMS/TCP header, followed by a AMS Header followed by ADS data. ADS data is optional, a package does not have to send ADS data if the request is fully specified without additional information for example.
Checkout the Beckhoff information system for an overview over the exact fields inside each part of the packets.
Dissecting the request from the example program according to the Beckhoff ADS specifiction yields:
Secondly, Neil Davis from Digital Cloud Training has created an ebook containing Cloud Practitioner test exams. The ebook is called AWS Certified Cloud Practitioner Practice Tests 2021 and is available here. The interesting thing about this ebook is, that it is free if you subscribe to kindle unlimited. kindle unlimited is a paid subscription that lets you read a selection of ebooks on your kindle or using the kindle software for your mac or PC. The kicker is that there is a free 30 day testing period for kindle unlimited! That means if you are preparing, 30 days should be enough to go through the test exams in Neil’s book!
Thirdly, steeling Neil Davis content from Amazon is not the only recommendation I have for you. I strongly recommend buying Neil Davis Udemy course on the Cloud Practitioner Exam. Neil is my favourite instructor because he calmly explains the AWS topics in a very well structured manner. It is actually nice listening to him and learning from his explanations. As a native speaker his presentation and speech is very, very good and the audio quality and the speed in which he presents the topics is perfect. He covers a lot of ground in his course, adds hands-on-learning videos on top and adds another test exam to the course for you to practice.
One tip for Neil Davis’ courses: Whenever Neil talks about fairies, he wants to teach you the theory of a body of knowledge! He is not talking about fairies but about theory.
Also, did you know that when typing in “Udemy sale” into google, there is a very, very high chance, that the Udemy page will switch into the “Sales”-mode, in which it will sell you all courses with a high discount! I do not know why this is, but for me it works consistently. That means, you can get Neil’s course on a budget too!
Fourthly, did you know that when you add a skill to Alexa, Amazon rewards you with monthly credits for AWS? If your free tier ran out, you maybe can make some credits for further practice.
Fifthly, do not let anybody fool you! The exam is not easy to pass! Without knowing about the majority of the AWS Services, you stand no chance passing the exam! Look at the exam guide: https://d1.awsstatic.com/training-and-certification/docs-cloud-practitioner/AWS-Certified-Cloud-Practitioner_Exam-Guide.pdf and make sure you have a basic knowledge about what all services do that are mentioned in this exam guide! This is the basis of the exam!
Sixthly, before taking the exam if you are not a native english speaker, you can request a test accomodation which is a 30 minute increase on the 90 minute test duration. Voucher codes and non-native English language + 30 mins – https://aws.amazon.com/certification/policies/before-testing/
If you do not own a credit card and cannot sign up to AWS, you can prepare using quick labs: I don’t have an AWS account to do hands-on lab ? What do I do ? – https://amazon.qwiklabs.com/catalog?locale=en This will give you a AWS account which lives for one hour and is then erased completely!
Seventhededly, if you sign up for the Get-Certified-Challenge (Registration will be open March 29 – June 11, 2021), https://pages.awscloud.com/takethechallenge, not only will you receive newsletters with information material and links to free courses, but you also will receive a voucher for a free practice exam!
Eigthedly, here is a practice quiz with 30 questions: https://amazonmr.au1.qualtrics.com/jfe/form/SV_eyBlfVF4Sloz1zL?CPEPowerHour=APR21IntroAWSCloud
Ninethly, how can you gain an overview over which compute service is used for what purpose exactly? The answer is, by reading this page: https://aws.amazon.com/de/products/compute/ which outlines the purposes nicely.
A design system is the reference manual or collection of rules for designing websites that all share a common look and feel.
It defines how space is used, which fonts and font sizes are used when and where, how input elements look and behave, which colors are used when and where and all other aspects that should be part of the common experience.
A design system should incorporate a Coorporate Identity design if it exists. A design system will extend the coorporate identity into the interactive digital space.
It should be based on the principals of human machine interactions based on computer science work to make it easy for a user to benefit from the digital system.
A grid system is a layout mechanism, which makes it an alternative to the CSS Flexbox Layout (aka. flexbox) and the CSS Grid Layout (aka. CSS grid).
Whereas both the CSS Flexbox Layout and the CSS Grid Layout are part of the CSS specification, a grid system is built using CSS functionality and it does exist in the CSS specification. As such there are numerous frameworks that each come with their own implementation of a grid system.
Certain features are common to all grid system. The features are described in detail later.
Difference between Grid System, CSS Grid Layout and CSS Flexbox Layout
Despite the naming similarities, a grid system is not to be confused with the CSS Grid Layout.
I think they do similar things but I could not figure out how they differ or if CSS Grid Layout is there to replace custom grid systems. Need more expertise.
On the twitter boostrap page for their grid system, it says that the grid system is implemented using the CSS Flexbox Layout!
What does a Grid System do?
A Grid System ultimately sizes and positions elements in a responsive fashion. The promise is, when done right, all elements will be assigned appropriate screen space across all viewport size possible. The benefit is that there is always enough width assign so the use can consume the content with maximum convenience.
In a grid systen, elements are put into rows. All rows have the same amount of columns. The amount of columns in bootstrap’s grid system is 12 for example. Other amounts of columns are possible.
Elements are assigned (different) column widths based on media queries. On viewport size changes, elements will take up a dynamic amount of columns because of what the user has defined for each query. On large screen sizes, an element might take up 3 columns for example. In a media query for smaller device, it maybe takes up 6 columns so it is still visible. In a media query for smartphones, it might even take up all 12 columns so it stretches an entire row’s width and the user can still make out its content nicely even though the screen is very small.
Elements, once placed into a row, will never leave that row. If the amount of columns are used up and there are still more elements to place into a row, the row will break and elements will start to stack on top of each other so they do not leave the row.
This most often happens when elements are assign higher column counts on media queries for smaller screens. This keeps rows separate from other rows at all times.
In most grid systems, the media-queries are predefined with standard breakpoints and are called xs, s, m, l and xl similar to clothing sizes. The xs media-query is for very small screen sizes such as mobile phones, xl is for desktop screens.
To define the amount of columns per media-query, a grid system usually defines CSS classes. Several of those CSS classes are then assigned to elements until the user has described the element columns in all media-queries. The CSS classes have no effect unless their media-query actives, which is when the CSS class has an effect on the element. It will then tell the grid-system how many columns the element consumes.
What happens when code is untested? At first, nothing major will happen. The first generation of team members knows the Ins- and Outs of the code. They created each part at their preferred speed. Large applications grow over several months or years and the knowledge is stored in the heads of the developers of the first generation. Due to untested code, there will be some bugs but the bugs can be solved by the devs because they know exactly who wrote the code, what causes the bugs and how to fix them quickly.
Bad things happen months and years later. The price is paid by the second generation of developers. Once people leave for new jobs, the team eventually is cycled out and the second generation takes over. Or maybe the A-Team of developers is put onto another project and the B-Team takes over. Lack of knowledge transfer and documentation leads to a phase of utter chaos. A vast, undocumented, untested code base is dumped onto a team that has no experience in the field whatsoever. Unexperienced people now get the job assigned to reengineer complex interactions in a short amount of time and to quickly implement new working features in a potentially broken code base. I argue that this task is almost as difficult as creating the original project although the difficulties lie not in the engineering part but in the understanding of the existing codebase.
Now nobody knows, what the code is actually supposed to do as there are no constraints described by unit tests on what the code currently does. People do not know if after changing the code, the app still works at the customer’s site because there is no test coverage that checks if parts of the application broke due to unwanted side effects.
People will shy away from changing the application instead, they will leave the company in search for a sane working environment and the app will finally be replaced altogether, when yet another new generation of developers or managers step in.
One part of the solution is to start unit testing as early as possible and to add integration testing with automated tooling support.
Tests in Angular
Angular was designed to be testable when Angular was invented and developed.
In Angular, there are unit tests written with Jasmine and Karma and end-to-end (e2e) tests implemented with Protractor. Both can be executed by the continuous integration tool or on every save during development.
Coming from other programming languages where unit tests also exist, understanding Jasmine Behaviour Driven Tests is not that hard, because the concepts of test suite, a setup and a tear-down step and individual tests within a suite correspond with other languages.
Where it gets hard is when Angular specific parts are mixed into the Jasmine tests. Understanding those Angular specific parts that are involved in an Angular unit tests for components is hard, because these parts simply are not existent in other programming languages.
Testing with Jasmine and Karma
Jasmine is a behaviour driven testing framework for JavaScript. Karma is a test runner for JavaScript. It starts a web server serving the testing code and allows a browser to access the served code. The browser can be controlled by Jasmine using a web driver.
The combination of Jasmine and Karma are used extensively by Angular. Angular adds Angular specifics to the otherwise JavaScript base tools Jasmine and Karma.
Angular Specifics
The Angular specific parts in Jasmine Unit Tests are the ComponentFixture and the TestBed. The TestBed forms the environment for dependency injection by creating a NgModule just for running a test. The ComponentFixture wraps the component instance under test.
TestBed
The TestBed is used to create an Angular module on the fly. That module is only used for the unit test at hand in contrast to modules you use to organize your code. It is used to contain all the services, spies, mocks and all other resources needed to successfully run the unit test. When the unit test ends, that module is removed from memory, it only lives during the execution of the test suite.
The TestBed will then be used to create the ComponentFixture through a call to it’s createComponent() method. (createComponent() is usually called in beforeEach()).
The ComponentFixture is actually not the instance of the component, which is tested! It is not the system under test. In the snippet above, you can see the line of code:
component = fixture.componentInstance;
The ComponentFixture can be asked for the system under test using the componentInstance property. It will return the instance of the component under test.
It seems as if a ComponentFixture wraps the instance of the Component that is tested.
Here is what is so very confusing to me: The TestBed.createComponent() method, despite being named ‘createComponent’ does not return a component! Instead it returns a ComponentFixture!
Because the ComponentFixture was created from the TestBed, it will use the providers and services that have been configured into the TestingModule which was created in the first step. That means your spies and mocks are now used by the fixture.
The ComponentFixture is used to run changeDetection() manually because in UnitTests, the Angular ChangeDetection system is not running at all. You have to trigger the system manually so all changes are reflected in the DOM before you can query the changes in your assertions.
ComponentFixture
A ComponentFixture is an object, which wraps the instance of the Component under test. The component instance uses the mocks and spies configured into the TestBed it was created by.
In the individual unit tests, that is in the describe() and it() methods, the component is used to call methods on and to check how it’s state changes.
describe('that, when using the FavoriteComponent', () => { it('should display a star when clicked', fakeAsync(() => { ... component.click(); ... expect(element.nativeElement.value).toBe('selected'); ... } }
CSS comments use the /* … */ syntax. CSS comments are part of a CSS file and will be sent over the internet to the client.
SCSS adds another syntax // …
SCSS syntax are not copied into the resulting CSS. They are therefore not send to the client. This allows you to keep the CSS files as small as possible while still having good documentation in the source files.
Variables
When using the same value, instead of placing independant values all over the stylesheet, consider using a variable for easier maintenance in the future.
Variables start with the $ symbol. A variable definition creates a new variable identifier and assigns a value to that identifier.
Variables can be used after declaring them. To use a variable, add the $ followed by the identifier in place of a concrete value.
Variables have scope which means the location a variable where is declared determines it’s visibility. A variable can be defined outside any rule, which makes it globally visible amongst all SCSS files. Defining a variable inside a SCSS rule limits it’s visibility to the rule and the nested rules within that rule.
Nesting
SASS allows you to nest selectors and properties.
Nesting for Selectors
CSS allows to chain elements in selectors to specify how to style nested elements that match that path defined in the selector. Basically a selector is a flattened representation of a tree structure. SCSS brings back the tree structure using nesting and saves some redundant typing.
To style elements on several levels of the same nesting hierarchy, you have to write the path over and over to extend it by another level until you have written all rules for all hierarchy levels you want to apply styles to.
SCSS allows you to nest rules to more naturally work with nested elements and their CSS. Instead of
The & operator refers the direct parent in nested rules.
Imageine to following HTML:
<ul>
  <li>list element 1</li>
  <li class="selected">list element 2</li>
  <li>list element 3</li>
</ul>
The list element having the selected class should be displaying in a darker color. With CSS you write several rules, with SCSS, nesting can be used which also allows for the use of the & operator.
ul { border: 1px solid green; }
ul li { color: #DCDCDC; }
ul li.selected { color: #808080; }
In SCSS, the same can be written using nesting.
ul {
  border: 1px solid green;
  li {
    color: #DCDCDC;
    &.selected {
      color: #808080;
    }
  }
}
Here, the & refers to the li element because li is the immediate parent for the rule where & was applied. & will be replaced by li after the SCSS compiler produced the output.
The & operator prevents SASS from adding a space between the parent and the child when flattening out the CSS. Adding the & operator will concatenate the elements instead of joining them with a space in between. This is useful for class-based selectors and for pseudo classes.
The CSS Operators >, + and ~
Without using the child combinator (>), CSS rules are applied over more than one level of nesting. Using the > operator, the CSS rule is applied over exactly one level of nesting, which introduces the concept of an immediate child.
The sibling operator (~) selects any following element regardless of how many elements are in between.
The adjacent sibling operator (+) introduces the concept of an immediate sibling, which is the sibling directly following an element.
With SASS, the operators >, + and ~ can be applied at the end of a parent element or at the beginning of a child element.
Mixins
Mixins are defined using the @mixin keyword and they are applied using the @include keyword.
A mixin is a container that can be filled with SCSS rules. When the mixin is applied, all SCSS rules inside it are pasted to that location. In a sense, mixins are similar to variables in that they are a central point to store information and allow for the reuse of that information in several locations.
To define a mixin container use the following syntax:
This post lists the ways you can send data around in a angular application which will be referred to as data flow.
Using interpolation, data in a component’s properties can be output to the HTML template. But then there is also property-, class- and other bindings such as two-way binding (Banana in a Box). Data can be exchanged between child (@ViewChild, @ViewChildren, @ContentChild, @ContentChildren decorators) and parent components. Events can be sent (EventEmitter). Forms can be used to submit data with validation. But why are forms needed in the first place, when we have data binding?
To a beginner all these concepts are confusing, this post lists all interactions and explains their major benefit and when to use them.
Interpolation
The value stored in a component’s property can be output on a template using the interpolation syntax.
import { Component } from '@angular/core';

@Component({
  selector: 'app-root',
  templateUrl: './app.component.html',
  styleUrls: ['./app.component.scss']
})
export class AppComponent {
  title = 'cockpit';
}
{{title}}
Interpolation also allows you to perform calculations and function calls.
{{10 + 20}}
{{functionCall()}}
The value can be placed anywhere in the template and is rendered as is. If you want to put a value from a component into an attribute of a DOM element or child component, do not use interpolation but use property binding.
Interpolation using getters
If your component contains a getter
import { Component } from '@angular/core';

@Component({
  selector: 'app-root',
  templateUrl: './app.component.html',
  styleUrls: ['./app.component.scss']
})
export class AppComponent {
  title = 'cockpit';
  username = 'username';

  get user(): string {
    return this.username;
  }
}
interpolation also works with the getter:
{{user}}
Getters and Change Detection
As angular uses an elaborate change detection mechanism, the getter should not return a new object each time it is called but instead should return an immutable object which remains identical unless the data actually did change.
For an object to be immutable, the object is never modified but recreated from scratch each time data changes. If the data stays the same, the getter will return the same immutable object instance instead of returning a new string or a new object every time it is called even if the data is the same.
That way, using immutable objects, change detection can compare objects returned by getters correctly an only redraw that part of the page, when a new object is present, which means that data did actually change.
Refrain from constructing new objects on the fly and returning them from a getter as this throws change detection into a loop and causes angular to perform unnecessary work when rendering the page.
Naming fields and their get and set methods
Coming from a Java background, where getters and setters are also available, the expectation is the following syntax:
public class MyClass {
  private String fieldname;

  public getFiendname() {
    return this.fieldname;
  }

  public setFieldname(const String fieldname) {
    this.fieldname = fieldname;
  }
}
This means, getters and setters are in essence normal member functions or methods. They have the conventional set and get prefixes to make them immediately identifiable as getters and setters. This convention is also mandated by the definition of a Java bean.
In Angular/Typescript, the keywords get and set exist and they are special syntax for getters and setters. The downside of this explicit notation is that getters and setters basically use the identifier that would be used for the field itself! There is a naming conflict here! How to resolve that conflict? This depends on the conventions you agree upon in your project. There is an underscore convention which is outdated apparently. Then you can choose a different name for the field and use the compact identifier for the getters and setters. Ultimately there is no definite solution to the name conflict issue.
Event Binding – Calling methods in components from the UI
Event Binding uses braces around attributes like this: (attr)=”eventHandlerMethod()”
You can bind to the click event of a button and call a function in your component.
Another example of EventBinding is to bind a method of a component to the submit event of an Angular template-driven form (https://angular.io/guide/forms).
When the form is submitted using the submit button, the onSubmit() method in the component is called.
@Input – Property Binding – Passing data from a parent to a DOM element or child component
Property Binding uses square brackets like this: [attr]=”value”.
As the template of a component can contain other components, a parent child hierarchy is formed. The parent, the component owning the template can put a value into an attribute of a child component. The child component can make use of the attribute by mapping that attribute to a field in it’s own class.
The mapping is created by annotating a field using the @Input() annotation. Now that field is mapped to an attribute of the same name in the template. To pass a value to the child, the attribute has to be surrounded by square brackets (= the binding operator). The binding operator takes the value inside the square brackets and tries to find a matching field in the component. It will then set the value to that field.
Imagine a DetailsComponent that is supposed to display a model object. An example could be a UserDetailsComponent displaying a user domain model.
@Input()
user: User;
The template of the parent component contains:
<user-details [user]="user"></user-details>
In this example, the user variable used as value can be created by a *ngFor directive or can come from somewhere else. It will be supplied by the parent component in most cases.
The NgClass Directive
The NgClass directive can add or remove CSS classes to a DOM element. It expects an object as a parameter. The object contains the intividual CSS classes as properties and boolean values that either add that particular class when the boolean value is true or remove that class when the value is false. Instead of hardcoded booleans, the boolean value can be returned from a method in the component.
The code snippet above contains an input field from a template-driven form. The two-way binding is applied to the ngModel directive which is defined in the FormsModule. ngModel connects input from the template to the component.
The assignment to the Two-way data bound ngModel is using model.name as a value. model.name refers to the name field in the model field in the component that houses the template form.
This is a sentence that nobody will understand ever, so let me rephrase it. model.name refers to application defined fields. model is not a special keyword. It use a convention to name the target object that the form input is stored into, model. model.name is an example for a field of the model, which is called name. The two-way binding to model.name will store the user input into the model field of the component and inside the model it will store the input into the name property of the model object. If the object you store your data in is not called model, that is fine too, just specify the correct names in the two-way binding value.
Sending Events from a child to a Parent
Difference between a Content Child and a View Child
Angular ultimately renders a tree of components. A tree data structure defines nodes and their children. Children are nested into their parent nodes. In Angular components are nested into components.
There are two ways to nest components in Angular:
View Children
Content Children
Nesting a child component into a parent component is done by using the child components selector / tag in a template.
The distinction between view and component child is made by where, in which template the child component is used.
If the child component is used directly in the parent’s template, then the nesting is view nesting and the child is a ViewChild.
If the parent component is used in some “third-party” template and child components are used inside the opening and closing tag of the parent in the same arbitrary “third-party” template, then this is referred to as content nesting and the children are content children.
An example for view nesting is a fixed combination of components. A ColorPicker component might have a nested view child that draws the color space into a square or circle for the user to click into to select color in a explorative manner. Lets call this component ColorField. The ColorPicker component might have another nested view that represents the current color using sliders for the color’s red, green, blue and alpha values. Let’s call this component ColorCoordinates. In ColorPicker’s own template, the ColorField and ColorCoordinates components are used, which by definition makes them view children.
An example for content nesting is a Tab component which is used in the template of a Dashboard component. As content children, the Tab component will have several TabPane components, that the user can switch between. Instead of inserting TabPane components directly into the Tab component’s template as view children, the TabPane components are added as nested tags to the Tab-tag in the Dashboard component’s template. This allows the user of the Dashboard component to add as many TabPanes to the Tab component as they want or need. Applying this idea further, the content on the TabPane components again is added directly in the Dashboard component’s template which makes it another example for content nesting.
A component can have View and Content children at the same time. A component can also have neither View nor Component children at all.
The interesting question is, when a component has ViewChild or Content components, what can it do with those? The answer is that the component class will have references to those children and call call methods on those children components inside it’s own code.
Sometimes, classes annotated with the @Component decorator are refered to as the component’s controllers. Having View- or Content-Children is a way for the parent component’s controller to access the controllers of the component’s children.